AWS RDS
Goal
Connect to an AWS RDS database without going through complicated configurations like using TCP/IP over SSH.
Requirements
Access to the Dull Realm web server (e.g. https://123.realm.dull.net/).
Access to the AWS Console with sufficient privilages to access and modify RDS, EC2, and VPC.
The IP Address and Port that are being used by the Dull Realm server (not the web server).
Steps
1. Configure VPC
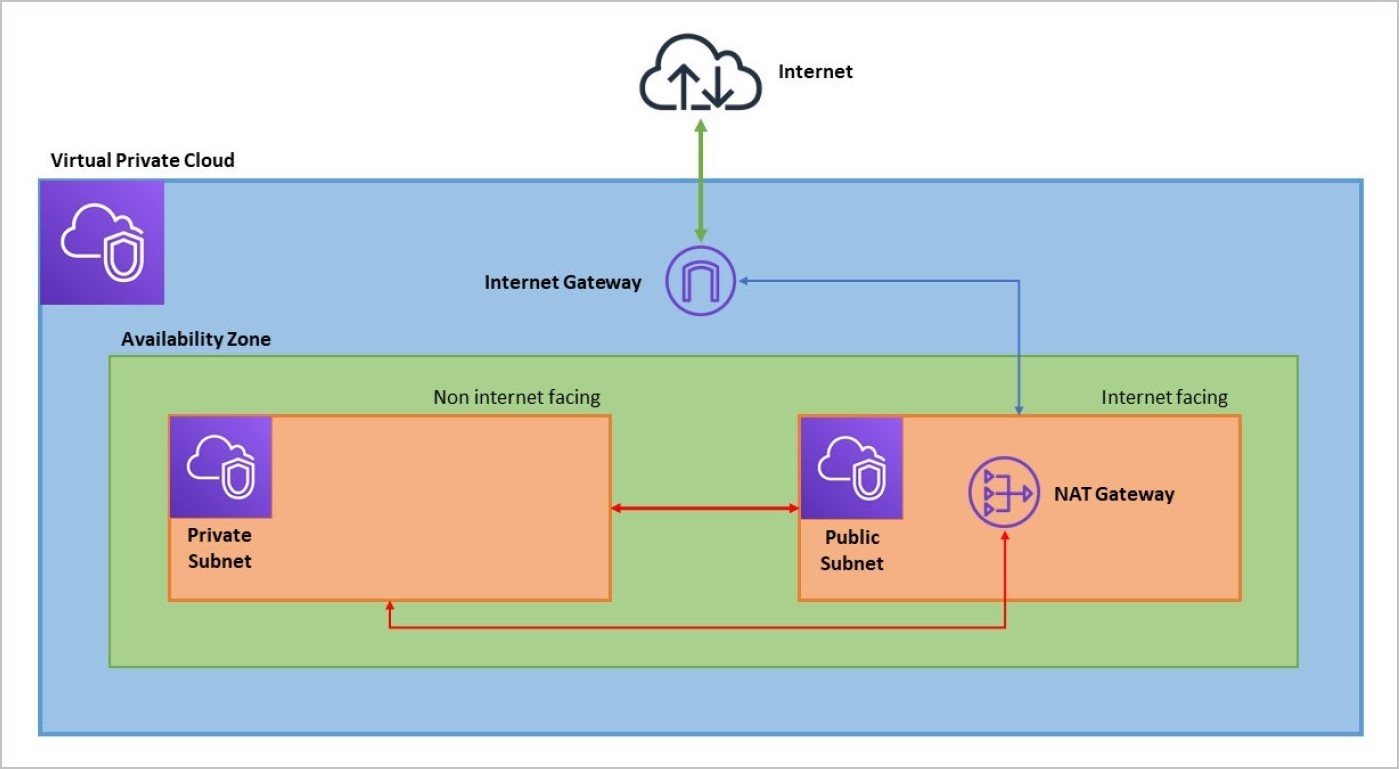
Your VPC should have at least 2 subnets under an Availability Zone: 1 Public and 1 Private subnets. The public subnet will allow internet access. The private subnet will not have internet access.
Ensure that the RDS database is inside the Private subnet. We don't want our database to be exposed to the world. On the other hand, the publicly accessible EC2 intance(s) that will access the database should be inside the Public subnet.
If you haven't created a VPC yet, you can follow the instructions found in Creating a VPC with Public and Private Subnets for Your Compute Environments.
2. Set-up RDS
This assumes that you already have created an RDS database inside a private subnet. In this example, we will be working on a MySQL/Aurora database. We will tackle other configurations that we need to add to achieve our goal.
If you haven't created an RDS database yet, you can follow the instructions found in Create and Connect to a MySQL Database.
2.1 Database Security Group - Inbound
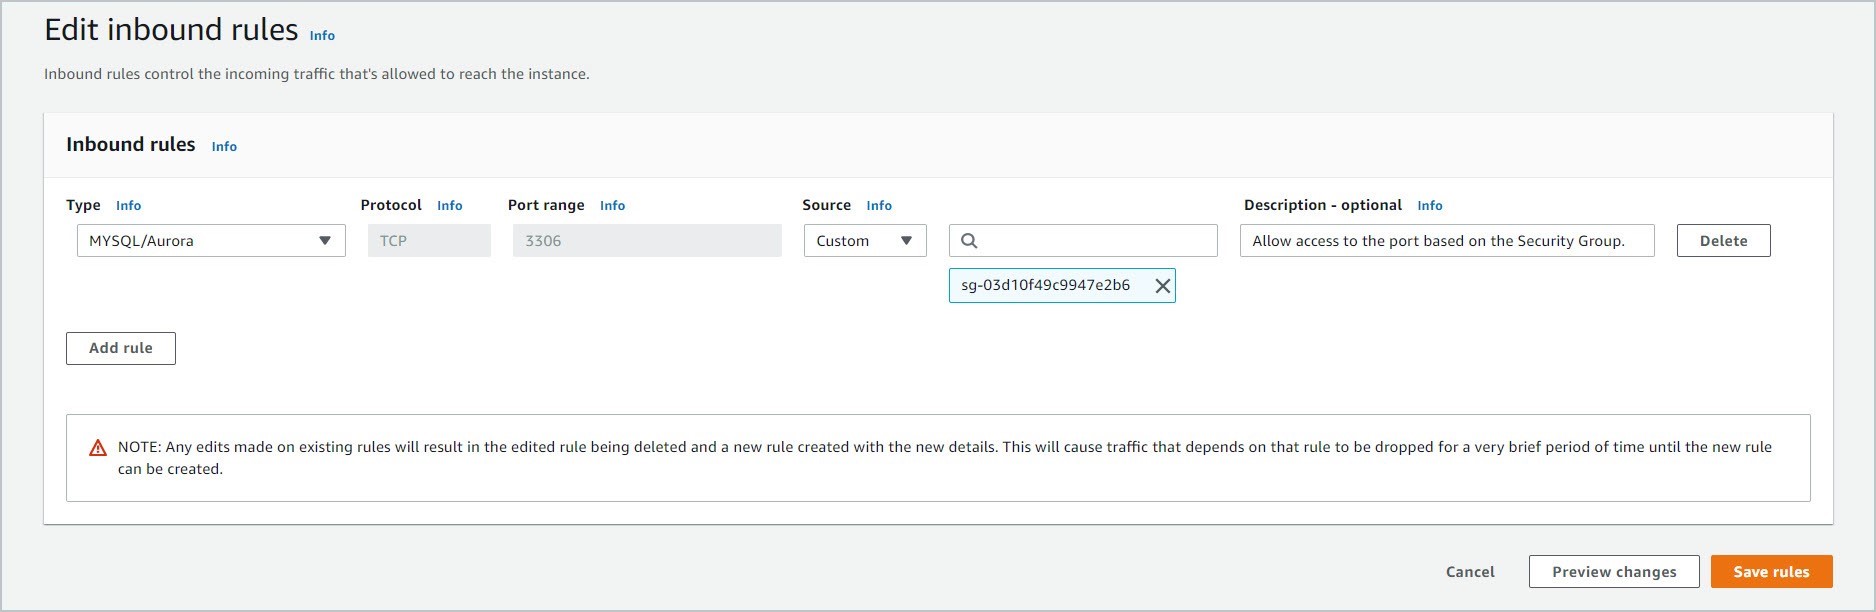
2.1.1 Open the security group that you have assigned to your RDS database. Go to the Inbound rules tab. Then, click Edit inbound rules.
2.1.2 Add the security group that was assigned to the EC2 instance that will access this database which is inside a public subnet.
Ensure that the correct Security Group is specified. This will allow access to any EC2 instances that uses that security group.
2.1.3 Click Save.
3. Set-up EC2
This assumes that you already have created an EC2 instance inside a public subnet. We will tackle other configurations that we need to add to achieve our goal.
The IP Address and Port that are being used by the Dull Realm server is required. Ask your System Administrator about it.
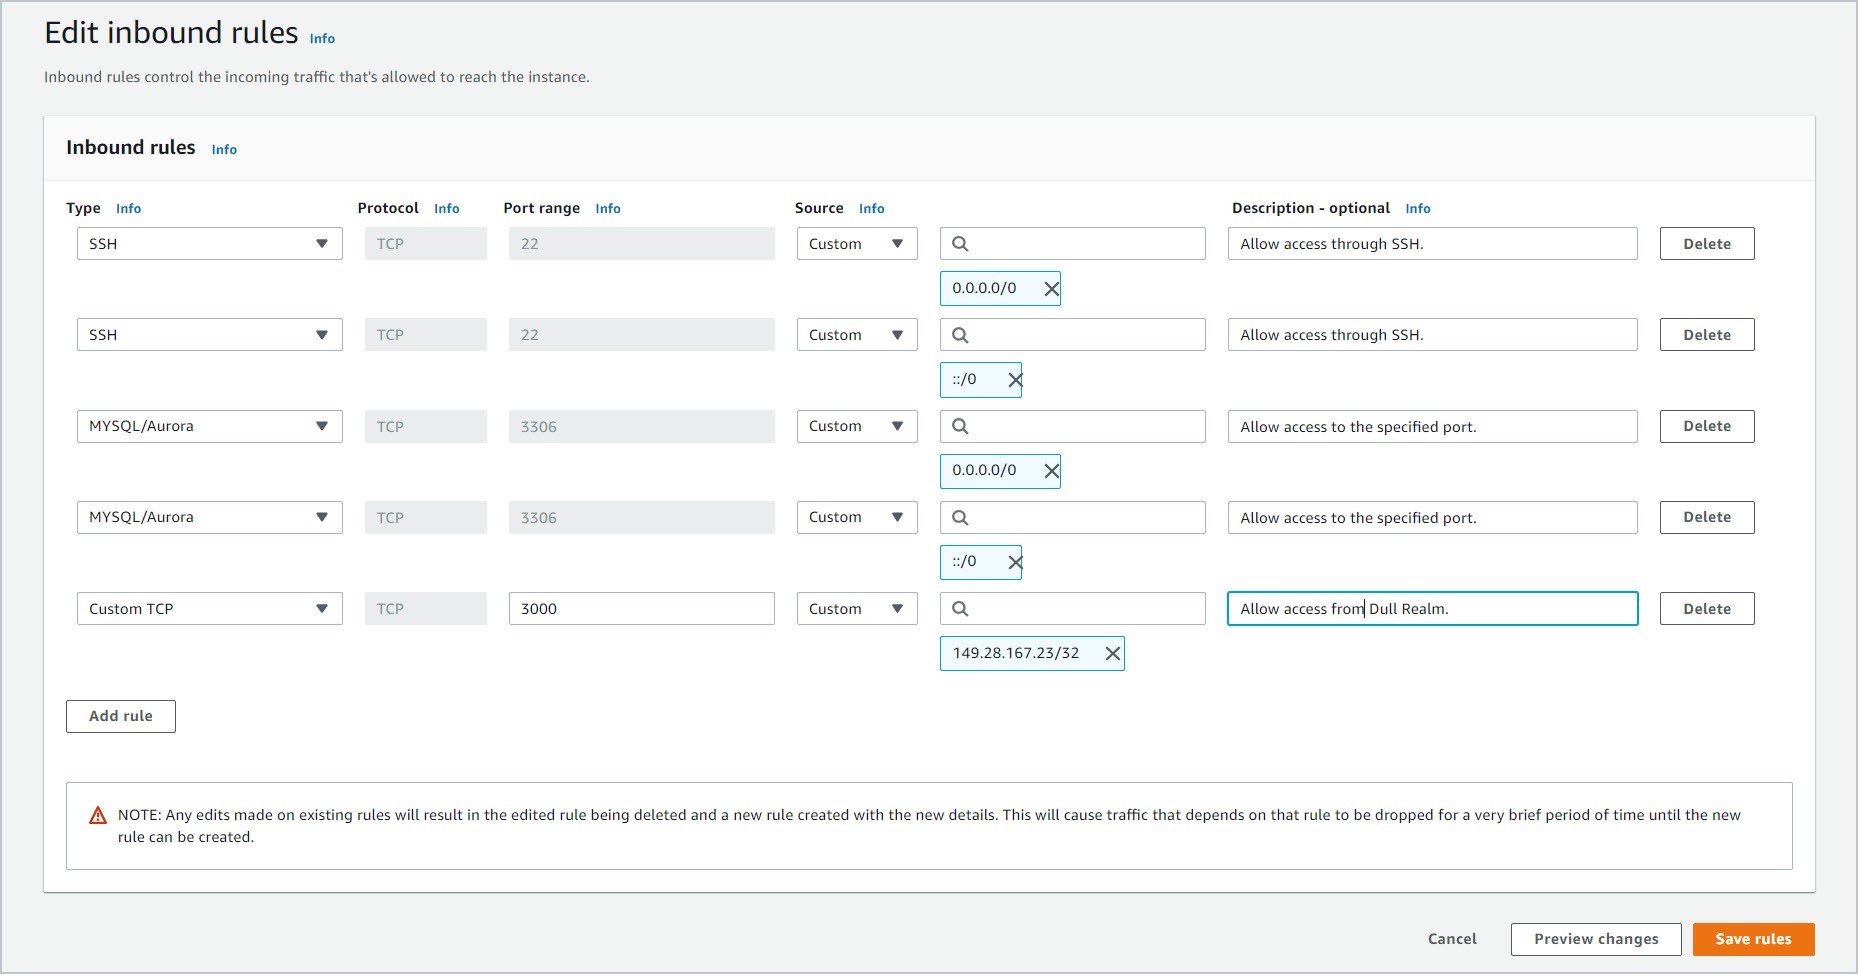
3.1. EC2 Security Group - Inbound
3.1.1 Open the security group that you have assigned to your EC2 instance. Go to the Inbound rules tab. Then, click Edit inbound rules.
3.1.2 Add the IP Address in CIDR notation and the Port that are being used by the Dull Realm server. In this example, the IP Address is 149.28.167.23. The CIDR notation for it is 149.28.167.23/32 and the port is 3000.
The IP Address and Port that is being used by the Dull Realm server is crucial. Without it, the Connector Agent won't be able to talk to it.
3.1.3 Also add the MySQL/Aurora port 3306.
3.1.4 Click Save rules.
3.2 EC2 Security Group - Outbound
3.2.1 Open the security group that you have assigned to your EC2 instance. Go to the Outbound rules tab. Then, click Edit outbound rules.
3.2.2 Add the IP Address in CIDR notation and the Port that are being used by the Dull Realm server. In this example, the CIDR notation is 149.28.167.23/32 and the port is 3000.
3.2.3 Also add the MySQL/Aurora port 3306. Then, add the security group that was assigned to the RDS database which the EC2 instance will access.
3.2.4 Click Save rules.
4. Install the Connector Agent in EC2
The Connector Agent is the one that will be communicating with the Dull Realm server.
Follow the instructions on how to install the connector agent from this page
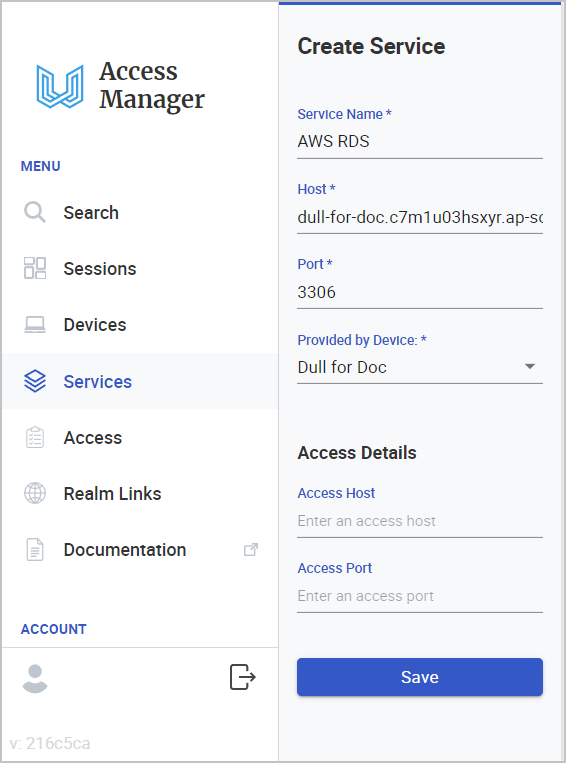
5. Create Service
To add a Service, you have to log-in to the Dull Realm server. This assumes that there is already a Device configured for the EC2 instace where the Dull Connector is installed.
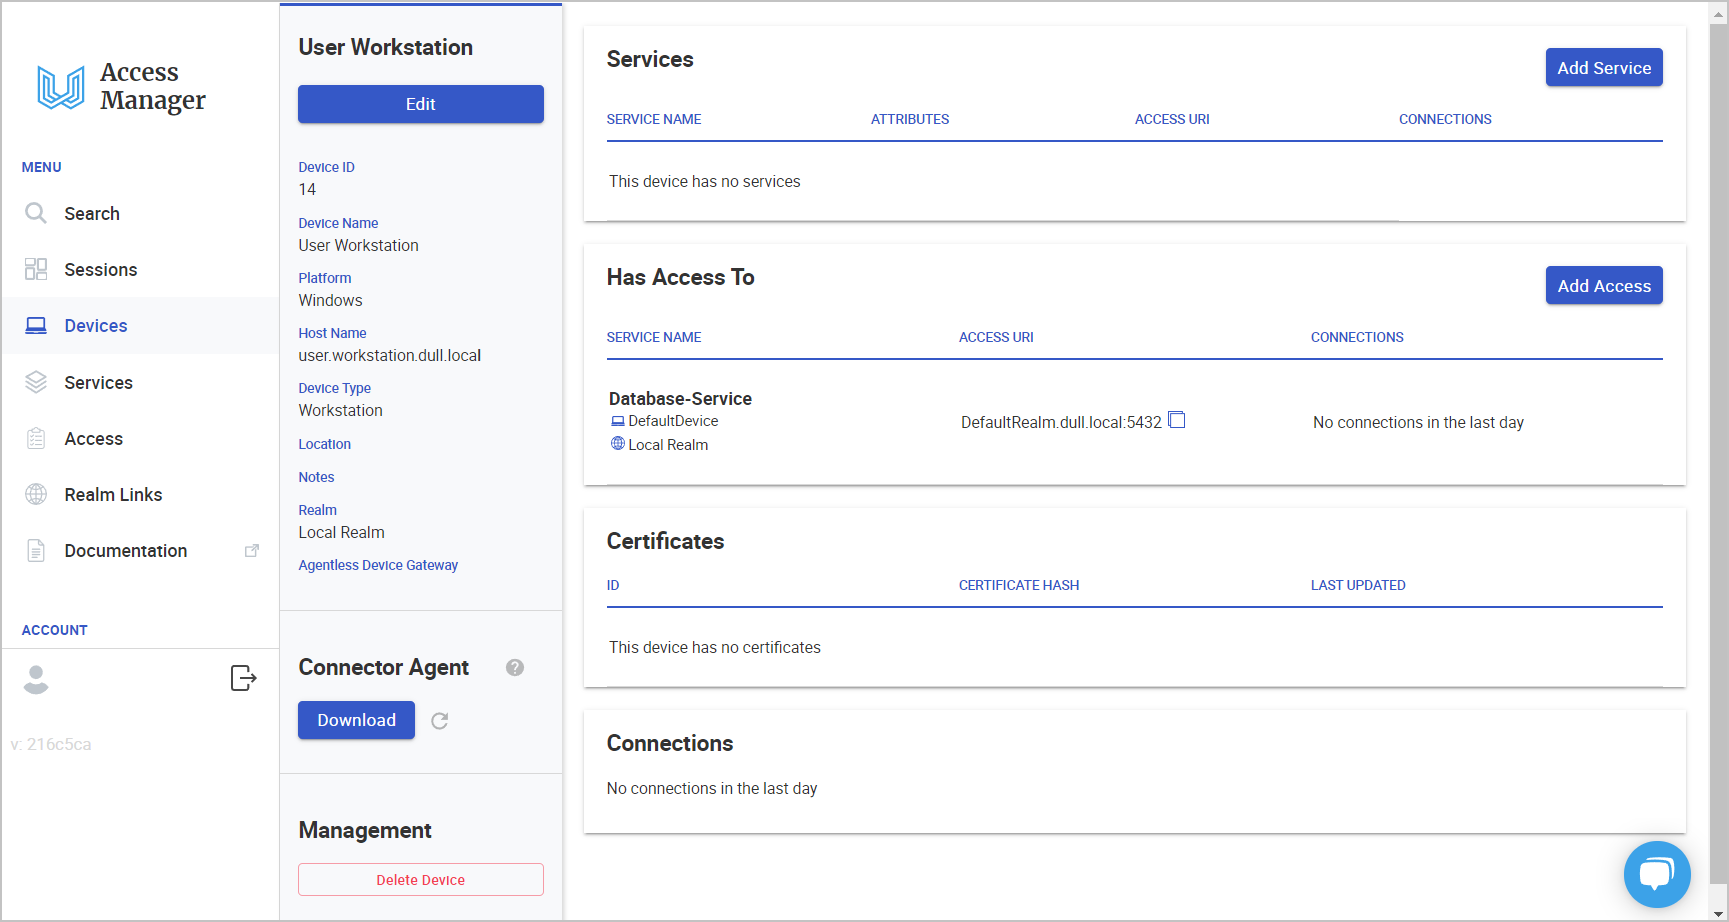
5.1. Click Devices in the left side main menu. Then, select the applicable Device.
5.2. Click Add Service and fill-out the details.
5.2.1 Give the Service a name: AWS RDS
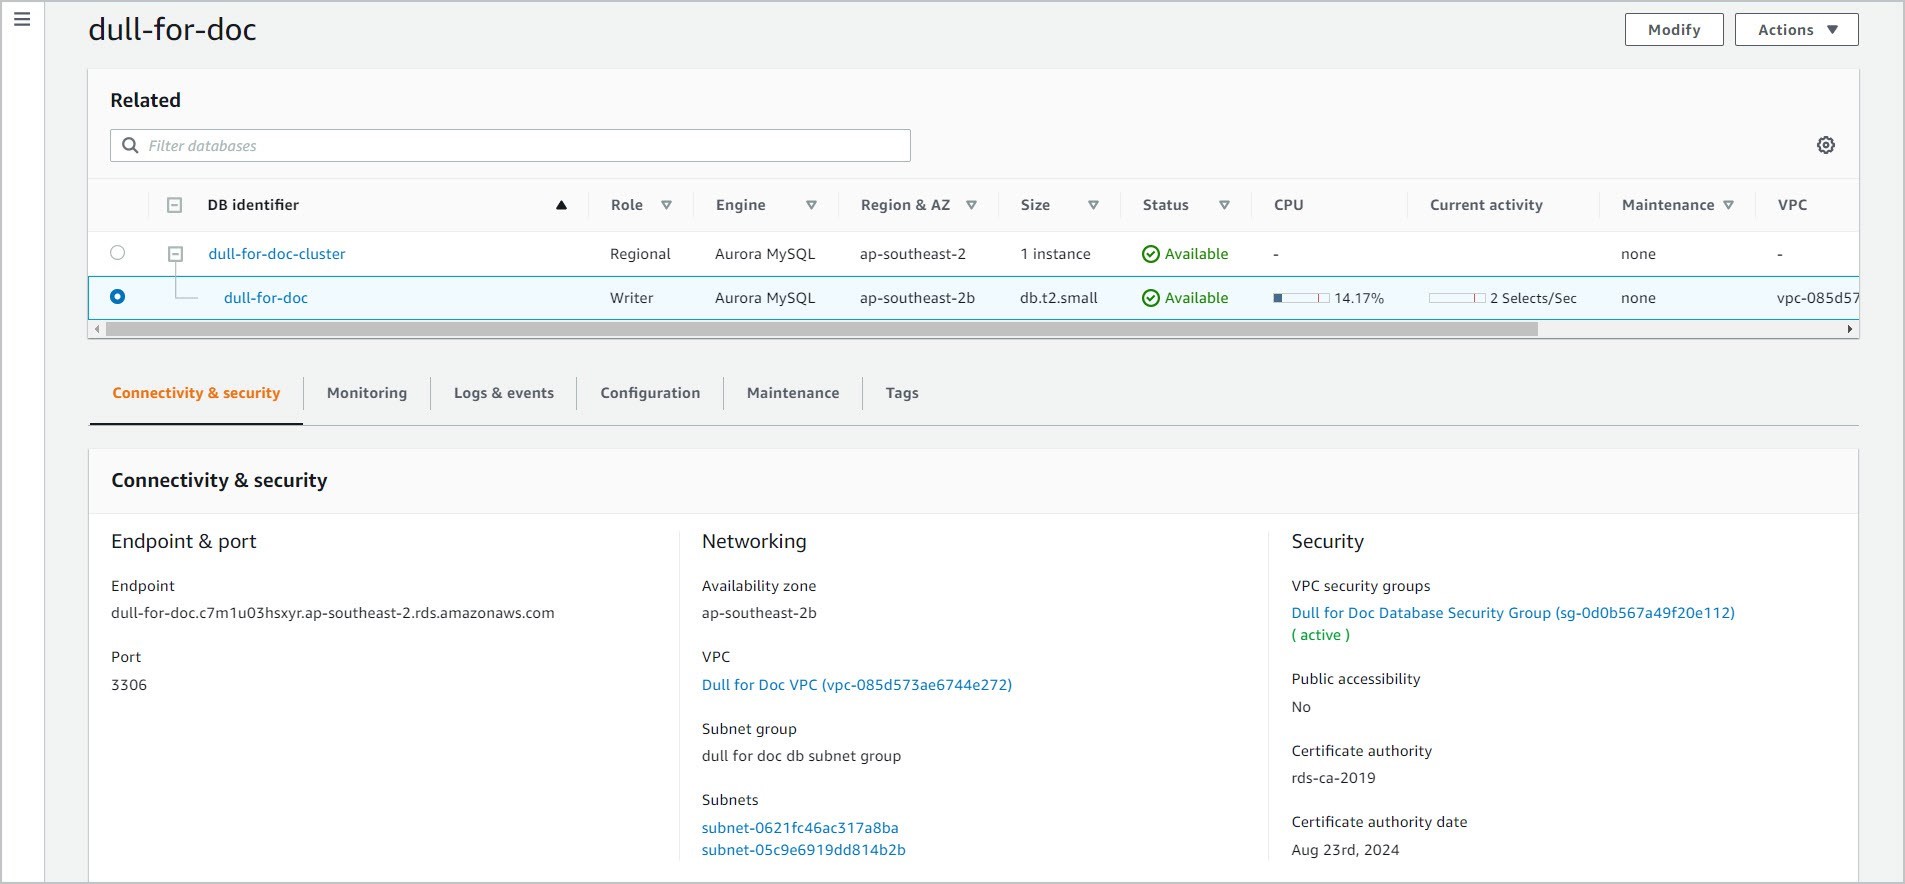
5.2.2 Specify the Host. This is the Endpoint of the RDS database. You can see this under the Connectivity and Security tab of the database.
5.2.3 Specify the Port. You can see this under the Connectivity and Security tab of the database.
5.2.4 Specify the Access Host. This will be the micro-networking name that will be used instead of the RDS database Endpoint.
5.2.5 Specify the Access Port. This is optional. If you don't specify a port, it will use the default port of the Host.
5.2.6 Click Save.
6. Add Desktop Access
After the Service set-up, we will now give ourselves access to the RDS database.
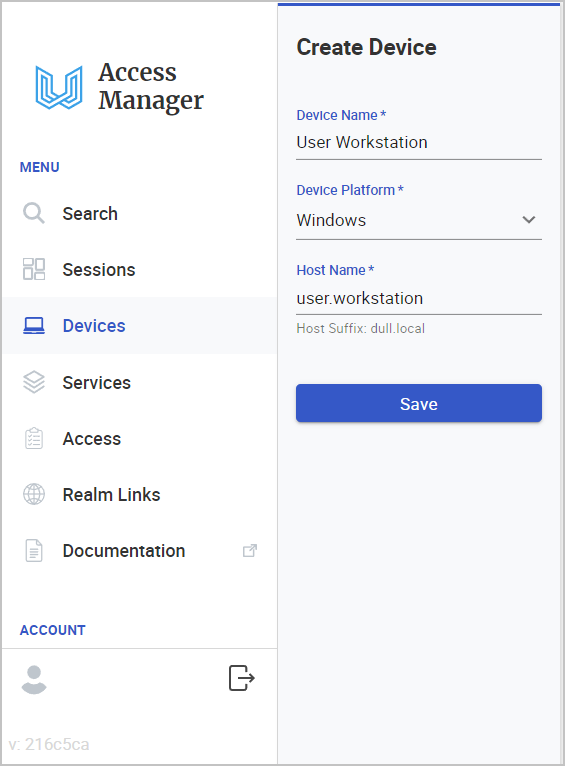
6.1. Create Device
6.1.1 Click Devices in the left side main menu. Then, click Create Device.
6.1.2 Fill-out the details.
6.1.3. Click Save.
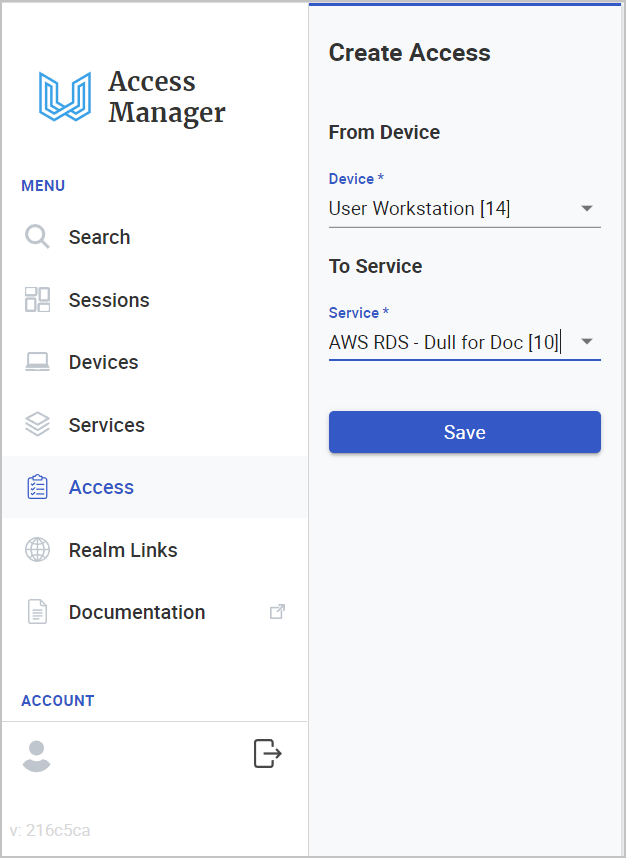
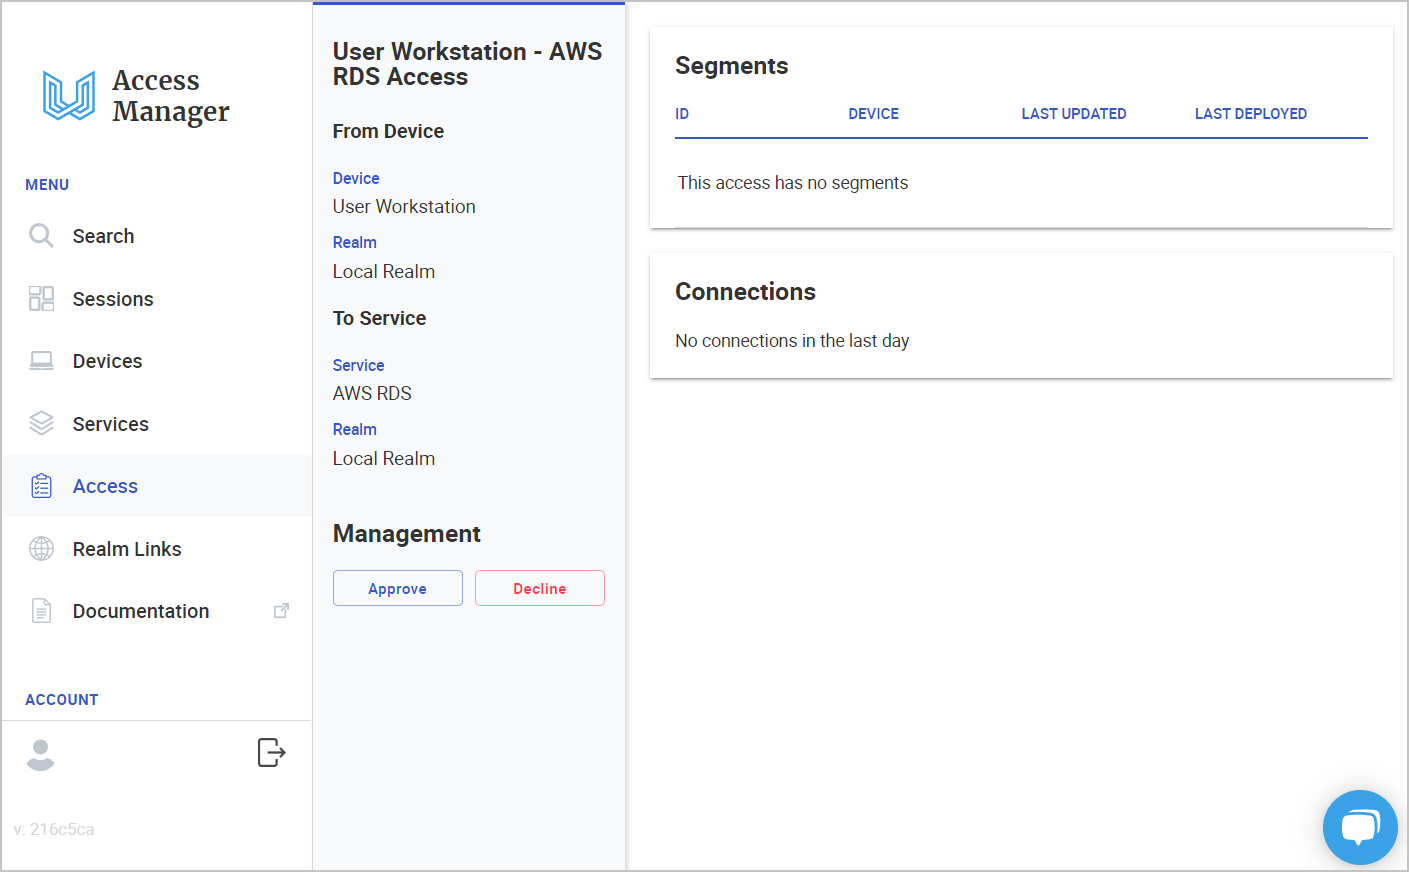
6.2. Add Access
6.2.1 From the Device that we just added, click Add Access.
6.2.2 In To Service, select the applicable Service that it could access. In this example, we will select the AWS RDS - Dull for Doc service.
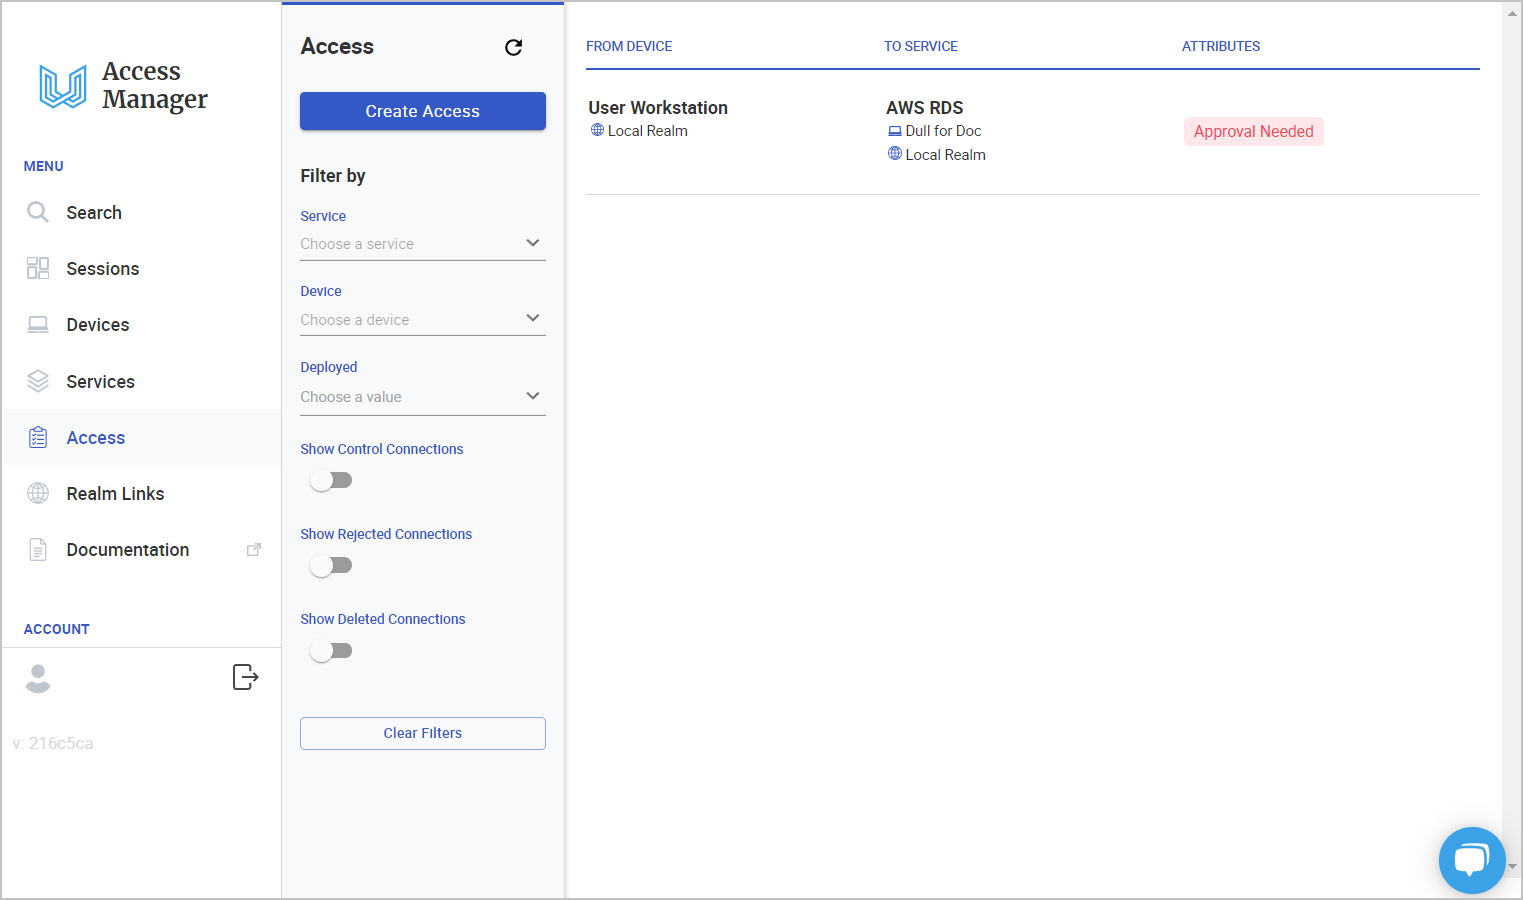
6.2.3 Click Save. 6.2.4 Find and click the new Access record in the Access list
6.2.5 Click the approve button
6.3. Install the Connector Agent.
Follow the instructions on how to install the connector agent from this page.
6.3.1 Once the Connector Agent is installed and running, you can now use your preferred database client to access the RDS database.
6.4. Access the Database
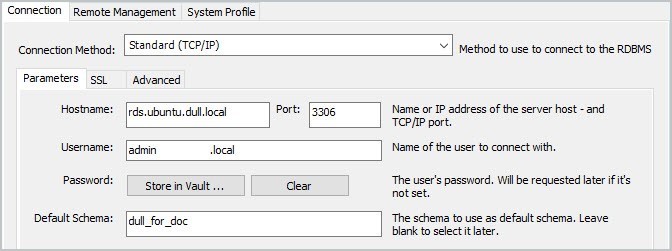
6.4.1 In this example, we will be using the MySQL Workbench database client.
6.4.2 Open MySQL Workbench and Create a new Connection and fill-out the necessary details.
6.4.3 In the Hostname field, specify the Access Host of the AWS RDS service. In this example, it will be rds.ubuntu.dull.local.
6.4.4 In the Port field, specify the Host Port or Access Port of the AWS RDS service. In this example, it will be 3306.
6.4.5 For the Username and Password fields, just specify your own credentials.
6.4.6 In the Default Schema field, specify the applicable database name that you want to access.
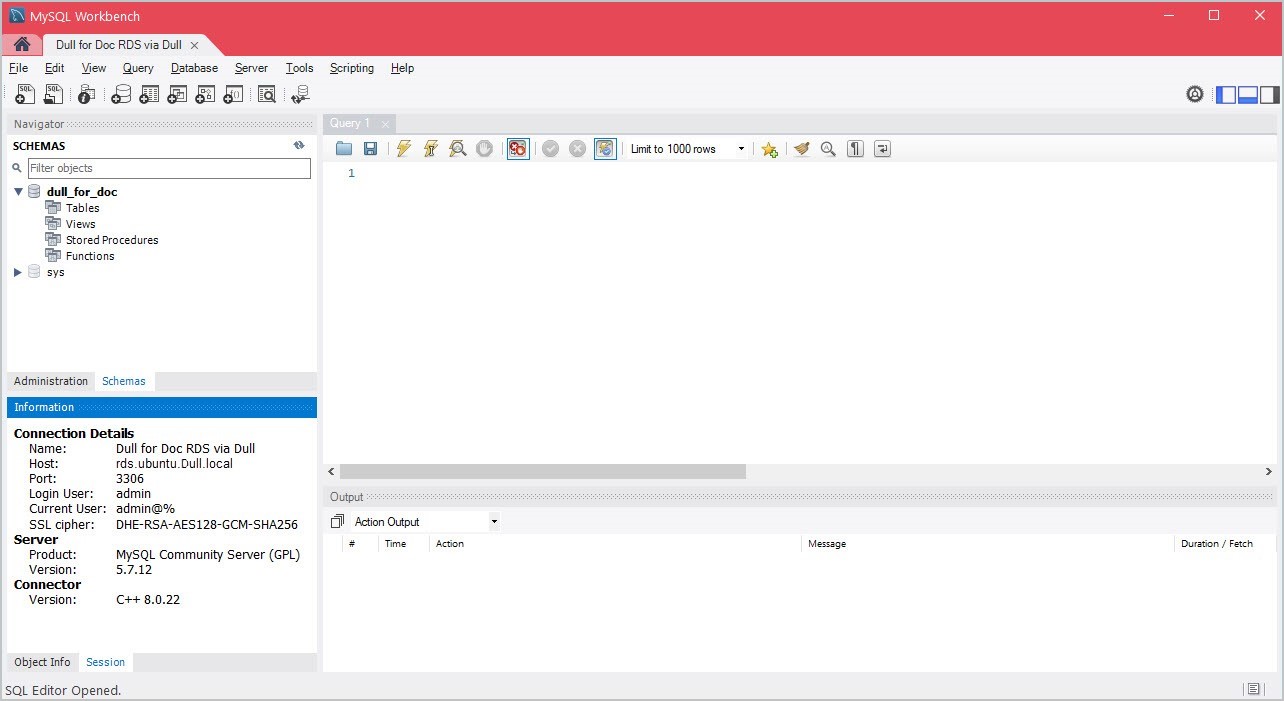
6.4.7 You can now connect to the RDS database.
Conclusion
Dull makes it easy to connect individual network-level services.
Compared to using a VPN, Dull provides individual direct connections. With a VPN, login credentials are often shared. With Dull, each connection is set-up with separate passwords and logging. Reducing your risks, improving compliance, and making the connections themselves a seamless experience.
Last updated